I love hearing from you!

If you ask a question in your comment, please make sure to either show your email in your blogger profile, or email me directly....this is the only way that I can answer you!

Friday, February 22, 2013

Clearly Inspired Challenge #69 -- CIC69


Hey there, crafty friends!  It's been a few weeks since the last Clearly Inspired Challenge because of our awesome new release, but we are back!  Are you ready for a new challenge?

Black & White with a Pop of Color

That seems easy enough, right?!  We want to see what you can create using mostly black & white and one other color.  Before you submit to our challenge, please read the CHALLENGE GUIDELINES.  Our lovely Lisa, designed a fabulous new digital set for this challenge that you might win just for playing!


Now let's see what the DT made to inspire you:


Vickie O'Dell --  featured digital image SPLATS

Cassie Trask -- featured digital image SPLATS

Although our team used only a pop of pink, feel free to use any color as your 'pop' :)

Please link directly to your project using Mister Linky down below.  We also ask that you link back here to Clearly Inspired Challenge sponsored by Clearly Digital Stamps.  Because of when our last release happened, you have until Thursday, March 7th at midnight to enter this challenge to be eligible for the prizes for the month of February.  Be as creative as you can while sticking to the theme.  Remember, only one entry per person, please :)


Thursday, February 21, 2013

We have Winners!


A huge thanks to all those that hopped along with us!  We have some winners to announce.  If you name is on the list, you will be emailed your prize today.  Congratulations!

WINNERS:
LAURA - Patty of Hap Scrappy
CASSIE - Leeann of Paper Doll's Creation
JENNIPHER - Love My 4 J's
VICKIE - Libby (northernmainescrappygirl)
JERUSHA - Lola from Little Card Maker 
JEN -terriavidreader of Teri's Tries @ Making Cards
LISA - THERESE CALVIRD of lostinpaper
LINDA - Donna of Indiana Inking


Tuesday, February 19, 2013

BEEutiful Day Card With Inking Technique

Happy Tuesday Tutorial day to you. Lisa here.  I made a card for last Sunday's blog hop using this technique I am going to show you today and loved it so much I decided to make it today's tutorial.  Plus I'll show you how to make this "BEE"utiful card using one of our clear stamp sets. 
I made this using Clear Stamp Set HOME SWEET HIVE. 

I cut a piece of Bashful Blue by SU to 5 x 10".  And scored at 5" on the long side and folded with a bone folder with the bump on the inside.  

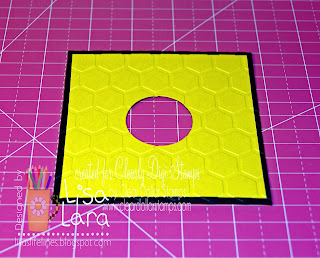
I cut two panels.  True Black by Papertrey Ink to 4 1/4 x 4 1/4 and Crushed Curry by SU to 4 x 4".  I adhered them together with double sided tape. 

I used a ruler to find the center of the yellow piece and centered my 1 3/8" spellbinders circle die and held it down with Washi Tape.  

I embossed my panel by placing it face up on the flat side of the Cuttlebug Embossing Folder HONEYCOMB. 

I rubbed the Crushed Curry ink pad by SU over the top of the embossed panel.  (this works best with folders that give a high impression).  I kept moving my panel around until I got the desired coverage. I love the distressed look this creates. 

Using the clear stamp set HOME SWEET HIVE I stamped my bee on the honeycombs using Versafine Onyx Black ink (it gives a good solid black image). 

I placed the bee panel centered on the card base and lightly traced the circle window in pencil.  Then I stamped my sentiment with VersaMark ink pad and heat embossed with White Embossing Powder.  

I placed 1/16" Scotch dimensional tape cut into pieces to the back of the bee panel to adhere to the card front.

Voila.  I embellished with Licorice Divine Twine, Crystal gems and Crop-a-dile Corner Chomper 1/2" (We R Memory Keepers)

Here's another sample using this technique.
On this card I used my digital image I designed BUMBLES.  
I used the Cuttlebug Embossing folder JULI'S GARDEN.  I rubbed Memento teardrop ink pads over the top. I love the multi-colors. I placed silver pearls in the flower centers.

I'd love to see what you make!


Sunday, February 17, 2013

Sunday Blog Hop -- Happy Birthday


Welcome to the Clearly Digital Sunday Blog Hop!  These blog hops are the third Sunday of every month....a must see for a lazy Sunday afternoon!
Each month we will have a theme which each Design Team member is challenged to interpret any way they like. 
The theme for February is:

Happy Birthday

Now for some hopping!
We ask that you browse through each Design Team member's post and leave them an encouraging comment....short or long, they all are appreciated!
There will be a prize each month!  There was a great response to the way we changed things up last month with the prize, so we are keeping that change!  Each DT member is showcasing a digital image, and you could win that image!  There will be a winner from each participating DT member's blog.  
WINNER:  The winners will be randomly chosen from comments received on DT member blogs. The winners will be announced on the CDS blog Thursday, February 21st.
...........................................................
Let's go look and see what my other DT members did!
Remember, leave an encouraging comment and be entered to win our contest....the more comments, the more times you are entered!

Clearly iStamp (you're here)

Have fun hopping, my friends, and be sure to leave comments along the way!  You could be the winner of a digital image!
Thanks for hopping with us!  
Hope your day is filled with blessings and stamping galore!


Friday, February 15, 2013

February Digi Release Day at CDS!

Hello Everyone!

It is time for another Digi Release!

The girls have really created some adorable digis for you to use this month....I can't wait to share them with you!
.....................................................................
But first.......
Are you new to digis?
Well, if you are, here is a quick explanation.  You will buy and download a "zipped up" file.  You will unzip this file and receive all the images in jpg and png formats.  You will then pull those into a Word doc or picture editor and print, print, print.
Here is a little tutorial and FREE digi that will help you learn the ropes!
...................................

Digis by Lisa Lara

This set is going to be perfect to create all kinds of Spring and Easter treats with this month!
Lisa has created some adorable background papers to go with them....I can't wait to pull together a few minutes with them and get creative!  She has added enough sentiments to this set to make it a perfect all occasion digi!

Peep Peeps Digital Image

Designed by Lisa Lara. Copyright Lisa's Doodley Doos. Licensed by CDS.


The DT members who created previews with this digi:
...................................

Oh my!  Who doesn't love a cute bunny....and is this bunny cute!  I love how Lisa added a riddle to the sentiment choices.....just too cute!

Some Bunny Digital Image

Designed by Lisa Lara. Copyright Lisa's Doodley Doos. Licensed by CDS.


The DT members who created previews with this digi:
...................................

Birthday Digis....who doesn't need those every month!  The samples for this set are just adorable and sure to get your creative juices flowing!

I am going to be printing off a bunch of these cards to get a start on my New Year's Resolution:  don't miss anyone's birthday!  However, I have already missed three this month, I am going to try and catch up!

Eat More Cake Digital Image

Designed by Lisa Lara. Copyright Lisa's Doodley Doos. Licensed by CDS.


The DT members who created previews with this digi:
...................................

Digis by Deedee Anderson


Isn't this set just beautiful?  Deedee did an amazing job with this set!  Perfect for church card ministries and Easter!

Seasonal Crosses Digital Image

Copyright and designed by Deedee Anderson. Licensed by Clear Dollar Stamps.


The DT members who created previews with this digi:
...................................

So cute!  I can see these on Scrapbook pages, cards, and so much more!

Pocket Pals Digital Image

Copyright and designed by Deedee Anderson. Licensed by Clear Dollar Stamps.


The DT members who created previews with this digi:
...................................

Digis by Austin Owens

Time to do some scrapping and gift making with this set!  Austin has included some wonderful images and sayings to make any project special!

Baby II Digital Image

Designed by Austin Owens. Copyright Austie Bost Stamps. Licensed by CDS.


The DT members who created previews with this digi:
...................................

Take a look at this adorable set of cutie pies!  
I have a couple of cat lovers that would just love a journal or picture album embellished with these girls!

Cutie Pies Digital Image

Designed by Austin Owens. Copyright Austie Bost Stamps. Licensed by CDS.


The DT member who created previews with this digi:
...................................

You must take a look at the sample with this set....wonderful for so many gifts!

Time for Family Digital Image

Designed by Austin Owens. Copyright Austie Bost Stamps. Licensed by CDS.


The DT member who created previews with this digi:
...................................

Are you a bird lover?  Then this set is for you!

Bird in Hand Digital Image

Designed by Austin Owens. Copyright Austie Bost Stamps. Licensed by CDS.


The DT members who created previews with this digi:
...................................

Digis by Laurie Wilson

I just love this set!  I am going to make up some card sets with these adorable little lambs for some Sunday School Easter gifts....I think they will love them!  When I get them done, I will share them with you!

Loving Lambs Digital Image

Designed by Laurie Wilson. Copyright Clear Dollar Stamps.


The DT members who created previews with this digi:
...................................

Digis just got better!  Laurie has created these print and go cards for those times when you just don't have any time!  I've already printed and used them myself!

Loving Lambs Quick Cards

Designed by Laurie Wilson. Copyright CDS.


The DT member who created previews with this digi:
...................................

If you are a boy mom, this set is for you!  I love the colors and all the little monsters in this set!

Monster Mash Digital Image

Designed by Laurie Wilson. Copyright CDS.

Go to Monster Mash Digital Image


The DT members who created previews with these digi:

Religious Monster Sentiments Digital Image

Designed by Laurie Wilson. Copyright CDS.


The DT member who created previews with this digi:
...................................

Frogs are many people's favorite little critter....what a good thing to remind us to always rely on God!

FROG Digital Image

Designed by Lori McCroskey. Copyright Clear Dollar Stamps.


The DT member who created previews with this digi:
...................................

This set you will recognize from our stamp line!  Back by request, you can now obtain all these adorable images in digital format!

Filled with sentiments, you can add just the right "license plate" to your car to make your card complete!

Sometimes You're the Bug Digital Image

Designed by CDS illustrators. Copyright Clear Dollar Stamps.


The DT members who created previews with this digi:


Make sure and leave encouraging comments for our illustrators and design team....I think they have done a fabulous job this month!

Hope your day is filled with blessings and crafting galore!

Tuesday, February 5, 2013

Flower Factory Cuttin' Up File - SVG


Hello Everyone!

It is time for another Clearly Digi Stamps Cuttin' Up file today!

Today I am introducing the Flower Factory Cuttin' Up Set and showing you how to use them!

Flower Factory SVG Cuttin' Up File


Go to Flower Factory Cuttin' Up SVG file here!

Let's get started!  Today we are making these adorable little flowers!
We created these flowers with the Flower Factory SVG Cuttin' Up file!


 ................................................................................
What is an Cuttin' Up file or SVG file?
An SVG (Scaleable Vector Graphic) file has become the standard for web-delivered images.  Why?  Because these images are printable, cuttable, and scalable without any loss of resolution.  SVG files are very popular among scrapbookers and paper crafters for use with their electronic die-cutting machines such as Black Cat, Craft Robo, Klic-N-Kut, Pazzles and Wishblade (just to name some!)

SVG files do require third party software to to use them.  I have used Make the Cut and Sure Cuts a Lot with these files.  

........................
First, let me start with talking about my KNK Zing Machine!
I purchased this machine last fall, and I have had such a fun time with it!  This machine, paired with Make the Cut (MTC) are the perfect pair to create paper crafts for every occasion!  I can pull an image in to Make the Cut (for instance, one of our digital images) and print it and then the machine will cut around the image for me!  So much fun!
I just had to put a plug in for my favorite new crafting toy!
Whatever cutting machine you have, now is the time to pull your Cuttin' Up file into the design program you use with it, and start cutting!

Would you like to learn more about the Zing machine that I've fallen in love with?  Here is a link to their website and more information!

Get a KNK Zing today!


............................
Let's get started creating some flowers with the Flower Factory Set!


Here I have cut out two of the flower patterns that come in this set of 10 flower petals.


 I used double sided paper, so I could have some contrast in my flower.  Single sided paper would work fine too, but you will have to load your machine twice, where using double sided I only had to load paper and cut it once.


 I have added a strip of 1/8 inch Scor-tape here.  If you have never used Scor-tape, you just must try some!  It is just wonderful.  You can tear it!  No more gummed up scissors!  So much quicker too!

 After I applied the 1/8 inch Scor-tape, I trimmed the paper flower down to the edge of it.  This just makes it curl a little easier, and isn't so bulky on whatever craft I use it for.


 Here is a close up of what it looks like trimmed.  I put the tape on the side of the paper that I wanted to show or be on the top of the flower petal.  If you put the tape on the back side, you will have a sticky edge to deal with at the end.


 I have a little quilling needle I used to get started.  A pencil, wooden dowel, or anything round will work.  It makes it much easier and keeps you from getting folds in your flower winding process.  If you want to place a large brad in the middle of your flower, use a round object a little bit smaller than whatever size your brad is.  Above you can see I have started winding and the petals are falling nicely between each other.


 Here the flower petals are starting to land exactly on top of each other, which is going to create a very boring flower.

 So I decided to clip my strip in the middle and align my first petal between two other petals to make it look nicer in the end.


 Now they are staggered again!


 Here is my first size of petal all staggered and pretty!  You can keep adding rows of flower petals to make it as big as you would like.

 Now, I am starting with my second size and pattern of flower petals. 


Once again, my flower petals starting lining up exactly, instead of staggered, so I added a little tuck in my banding to get the flower petals staggered and pretty again.


Here is my flower with all the petals wound up tight...which is pretty in and of itself, but I want to give it more shape!


With a pencil, I started curling the petals over the pencil to give them the "flower shape" I was looking for.


After you curl it over the pencil, it helps to push it down and give yourself more room for more petals!


I am now halfway done......


Now, I have my pretty little petals all done!


I decided to put a brad in the middle of my flower....and I just happened to have this set that has a fuzzy velvet brad in it that matched perfectly!  I wish I had the yellow, but the blue is pretty too!


Isn't that pretty?


This is what the back looks like.  I just pulled the brad through the back of it to secure it in the middle of the flower.


Here are my flowers I created with one piece of 12x12 cardstock....with a little bit left over.  They are about two inches across.  I made the center of the left flower with my I-top brad/button/snap maker that I got for Christmas!  I will have to show you how to use that one day soon!

Hope your day is filled with blessings and crafting galore!