I love hearing from you!

If you ask a question in your comment, please make sure to either show your email in your blogger profile, or email me directly....this is the only way that I can answer you!
Showing posts with label Gifts. Show all posts

Monday, December 1, 2014

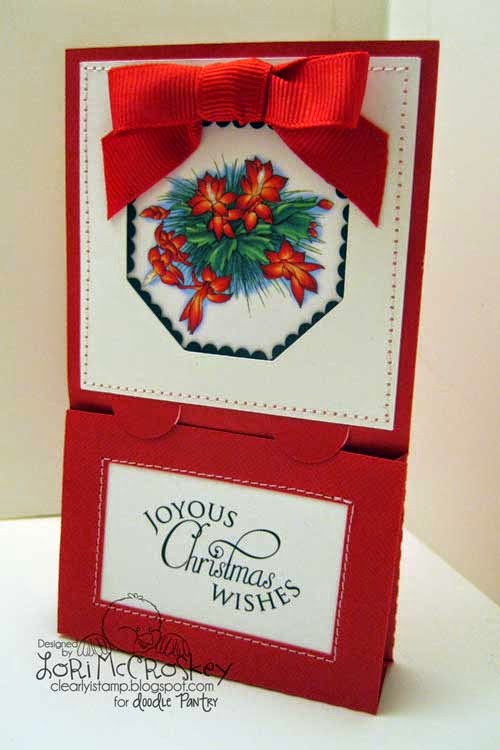
Gift Card Holder SVG cutting file for your e-cutting machine at Doodle Pantry!


Hello Everyone!

I can't believe Christmas is only 24 days away!
I love making Christmas presents and I am busily working away in my workshop each and every day!
I homeschool my girls, so I have to create a workshop so I can work as they work.  I have a Christmas curtain hung around my craft table to create a workshop.  The girls were so excited when it went up this last weekend!  LOL!
 
This month I decided we needed a gift card holder....
Perfect for Christmas, birthday, or any occasion!

Gift Card Holder

by Lori McCroskey


This gift card holder was created to frame out any digital image quickly and easily!

Take a look at how this goes together:
 

 Now wasn't that easy?????

Let's take a look at some of the samples for this SVG file:

In this sample,  I have put a sentiment in the window so the gift card does not show.


This sample, has the window left open to show the gift card.

Side view of how the gift card holder stands up.


Don't you just love this new digital image from Doodle Pantry!
It is one of my favorites!
It is called Wrapping It Up.

Simply a must have set!


 Let me know if you have any questions or have any suggestions for future cutting files!


Friday, April 4, 2014

Tea Bag Gift Set - or why not Scripture pouches?


Hello Everyone!

Today we are going to take a look at this little teabag gift set I made!
....................................................................................

PRIZE ALERT!!!!!!!!!! 
Make sure to come back for the next five days and comment on my release posts and 
ONE LUCKY WINNER
will be emailed the complete set of my SVG Releases for April! 
(Digital images used in sample, not included)
April 2-6th!
The winner will be announced on Monday the 7th! 
....................................................................................

Teabag Gift Set SVG

by Lori McCroskey

This little gift set would be adorable for some many uses....let's brainstorm!

Place scripture cards in the little teabags for a Scripture Gift Set
Place little reward certificates in the pouches for a School Reward Set
Place mini scrapbooks of pictures of grand kids in the pouches for a Grandparent Gift set
Place scavenger hunt clues in the pouches to create a scavenger hunt!

Maybe all of you can come up with some more ideas!
Make sure to leave any ideas you have as a comment....I would love to hear them!


Here is a close up of the box with the pouches.....


Remember that you can enlarge and reduce the pouches to fit your needs.
Just make sure to enlarge/reduce your box proportionally!


The frames on the pouches allow you to layer your hand trimmed digital images for a beautifully finished look!


The "bill board" on the box is also a frame for you to layer your images in!
The oval for your sentiments is a separate frame for layering.


Make sure to join me tomorrow for more samples with my new April SVG releases!

....................................................................................

PRIZE ALERT!!!!!!!!!! 
Make sure to come back for the next five days and comment on my release posts and 
ONE LUCKY WINNER
will be emailed the complete set of my SVG Releases for April! 
(Digital images used in sample, not included)
April 2-6th!
The winner will be announced on Monday the 7th! 
....................................................................................

Make sure to come back and comment each day for a chance to win the above prize!

Have a wonderful blessed day!


Saturday, September 28, 2013

Calendar Challenge Grand Prize Winner!!


Want to say Thank You to AJ and Shelly who played along in Calendar Challenge.
AJ finished a WHOLE calendar and used ALL CDS Images!!
Wahooooo!!!

So AJ you are the Grand Prize Winner!!
You get 6 CDS Digital Images for free!!
Contact me @ dunnitagaindesigns@gmail.com to claim your prize!


3 DAYS LEFT UNTIL STORE CLOSING!

We still have a bunch of deals....please come by and grab some before they are all gone!

Go here to see all of our deals! 

From now until the 30th of September all digis and SVG files will be 25% off!  Enjoy!
Enter this code at checkout:  SEPT30CLOSING
 
Some of the stamps will be moving with the illustrators while other will not.
Some of the illustrators will be phasing them into their new places. So if you want one NOW you better get it because it might not be available right away at their new home!!
Lauri Wilson - moving to Doodle Pantry
Patrick Dunnegan - not moving so if you want them get them NOW!!
Austin - not moving so if you want them get them NOW!!
Trudy Sjolander - unknown - go to blog for updates - True's Gifts from the Heart
Lisa Lara - unknown - go to blog for updates - Lisa's Life Lines

Saturday, September 7, 2013

Part 4 of the Calendar Challenge

I know I'm a couple days late. Life was not letting me craft. But I finally was able to sneak in my craft room today. I totally slacked and didn't get 3 done last time so I have 5 more to make these 3 weeks to get my calendar finished. But I will say I'm farther along then I would have been if I wasn't hosting this challenge.

The winner from Part 3 Calendar Challenge is:
Congratulations Shelly!
You have one a $5 gift code to Clearly Digi Stamps  
 Please contact Cassie (cassandratrask@yahoo.com) for your prize.


Kathy D.
It is ONLY $1.00 so you better get it!! What a deal!!

I love Halloween! What's better then dressing up, acting like a kid and eating lots of candy!! 
I used the sketch from Simple Sketches #2 Challenge.


This is our last challenge and then you should have a calendar completed, almost completed or at least started!! 
For every page you enter  (up to 3 entries) you will be entered into a drawing for two digital stamps at Clearly Digi Stamps. There will be a grand prize!! Anyone who completes a whole calendar (12 pages) will be entered into a drawing to win 1/2 the amount of Clearly Digi Stamps that you used on your calendar. So if you use 12 Clearly Digi Stamps to make the calendar you will win 6 Clearly Digi Stamps of your choice!! You don't have to use CDS images to enter but it will get you more CDS stamps if you win the Grand Prize.
CHALLENGE: 3 calendar pages any size (with or without pictures)


Time: Sept 7 - Sept 28 @ 11 pm (Central Time)


Prize: 2 Digital Stamps from Clearly Digi Stamps

Winner will be announced on Sept 29 @ 10 am (central time) 
* You don't have to make the pages in order. So start out with any month that you have inspiration for!

 CHALLENGE RULES:
  • You may use digis or stamps from any company on your challenge entry. Or no stamps at all but you must meet the requirement of the challenge.
  • If you use a CDS image then you will be entered twice into the drawing.
  • You may enter the Calendar challenge up to 3 times per post.
  • Please, no back posting. Your challenge entry needs to be a new creation.
  • Must link directly to your post that contains your entry.
  • We also ask that you link back to Clearly iStamp.
  • Any submission that does not fit the challenge rules will be eliminated from winning the prize and removed from the challenge.
Please link directly to your project using Mister Linky down below.


Tuesday, August 13, 2013

I did it!! and Part 3 of the Calendar Challenge!!

Just in time....but I did it!! I did 3 Calendar pages in 3 weeks!!

Kathy D.


 Sorry for the darker pictures. My Ott light bulb decided to go out after 6+ years!
This represents my September because my husband's birthday is the 13th so that means we go to Red Lobster or get Crab Legs from the store!! We love seafood and most special occasions are celebrated at Red Lobster!!
Their challenge is open to Sept 4th so head over there and play like I did!!

Winner of Part 2 of the Calendar Challenge is:
Congratulations AJ!
You have one a $5 gift code to Clearly Digi Stamps 
(She was entered into the drawing twice for each CDS image used!!)

 Please contact Cassie (cassandratrask@yahoo.com) for your prize. 
 

Let's go ahead and post Part 3 of the Calendar Challenge!!

We are going to challenge each other 
to make and complete a calendar by September.  
I figured we can do 3 pages in 3 weeks....surely we can! For every page you enter during those 3 weeks (up to 3 entries) you will be entered into a drawing for a $5.00 gift code for digital stamps at Clearly Digi Stamps. Then in September we should have a completed calendar! There will be a grand prize!! Anyone who completes a whole calendar (12 pages) will be entered into a drawing to win 1/2 the amount of Clearly Digi Stamps that you used on your calendar. So if you use 12 Clearly Digi Stamps to make the calendar you will win 6 Clearly Digi Stamps of your choice!! You don't have to use CDS images to enter but it will get you more CDS stamps if you win the Grand Prize.
CHALLENGE: 3 calendar pages any size (with or without pictures)

Time: August 13 @ 11 pm - Sept 4 @ 11 pm (Central Time)

Prize: $5 gift code to Clearly Digi Stamps for digital stamps.

Winner will be announced on Sept 5th @ 10 am (central time) 
* You don't have to make the pages in order. So start out with any month that you have inspiration for!

 CHALLENGE RULES:


  • You may use digis or stamps from any company on your challenge entry. Or no stamps at all but you must meet the requirement of the challenge.
  • If you use a CDS image then you will be entered twice into the drawing.
  • You may enter the Calendar challenge up to 3 times per post.
  • Please, no back posting. Your challenge entry needs to be a new creation.
  • Must link directly to your post that contains your entry.
  • We also ask that you link back to Clearly iStamp.
  • Any submission that does not fit the challenge rules will be eliminated from winning the prize and removed from the challenge.
Please link directly to your project using Mister Linky down below.


Monday, August 12, 2013

Reminder for Part 2 of Calendar Challenge!

Only 3 days left in Part 2 of the Calendar Challenge!!
It is not too late to get motivated to work on a calendar for a Christmas gift. Christmas is only 5 months away so time to start on those crafty Christmas gifts!!
Here are 2 pages for me so only one to go in this round. I hope to get the third one done tomorrow night! Wish me luck! And I see AJ of AJ's Creative Energy also has one more month to go on this round!! Come on AJ you can do it!! Also, a big Congratulations to Shelly of Ink & Sew who has completed 3 calendar pages for Part 2!! Thursday will start Part 3 of the Calendar Challenge!

 I used the sketch from Page Maps June 2013 for inspiration.


Tuesday, June 18, 2013

From FRUMPY to FABULOUS!


Hello Everyone!

Lori here with a tutorial that is sure to make your desk just a little cheerier!

Yes, we are going from FRUMPY


to FABULOUS today!


I don't know if any of you have priced colored hanging folders lately, but it is RIDICULOUS how much they want for a pretty hanging folder!  Staples wants $21.49 for 25 hanging folders....and then they aren't very pretty!  So I decided to dig in to my ENDLESS supply of cardstock and make some pretty ones myself!

Let's get started making our desk cheery now!

First, I removed the metal hanging rod from my frumpy green hanging folders....which I have a TON of.


Now, you could choose to just cover these green folders in cardstock, which is another great option, but you still have the ugly green inside :-)

Next, we are going to prepare our 12x12 cardstock to create our folders.

Cut your cardstock to 11 1/2 x 12 inches.

Using the 12 inch length side, you need to make these scor lines, or fold at these measurements:
Score at 9 and 10.5- 10 3/4 inches for the front side of your hanging folder.
Score at 9 inches only for the back side of your hanging folder.
 

 Next, use some double sided tape that is 1/4 inch wide and place it about 1/8 inches below the 9 inch score line.  You are going to use this strip of tape to adhere your metal hanging strip from your old folder.


 Next place a second piece of two sided tape (I am using Scor Tape) below your metal hanging strip.
Fold over at the 9 inch score line and adhere.
 This is what it is going to look like for the inside of the front side of your hanging folder.
I have begun to fold up my cardstock at the 10 1/2 inch score line to create my pockets for my labeling tabs.
 I am going to create pockets for my labeling tabs as shown below.
Place two sided tape at 1/4, 3, 5 3/4, 8 1/2, and 11 1/4.
 Fold this over and adhere....this creates your tab pockets!
For the back side of your hanging folder you are going to adhere the metal hanging strip just like the front side and fold over and adhere.  You will just omit the steps that create the tab pockets....unless you want tab pockets on the front an back of your hanging folder!

Now, we are going to tape the front and back together to create our folder.
I started by laying them bottom to bottom with the wrong side up.
 I then put a strip of tape the length of the folder.
Next, turn them over so the outside of the hanging folder is up.
Put another strip of tape across your seam, but this time make it longer than the folder and wrap it around the ends to the inside for extra strength.

Now for the tabs!
I was trying to decide what to use for the tabs and remembered that Austin had made this adorable set of borders which could NOT have worked ANY better for this project!!!!!

Borders Digital Image 
by Austin Owens

 Go To Borders Digital Image here!

So I chose this set of borders (because they match the coordinating duck tape drawers I made for my desk) to make my tabs!

When I pasted them in to my document to print them, I made the image 2 inches wide and let the length default to whatever size to make it stay proportional.

I then trimmed around the image and made the total height 2 1/4 inches high.  They could be longer, but I needed them this height for them to fit in their designated spot :-)


I decided then needed a little corner rounding.....

Slip them into your little pockets you created....
 
 I am going to make a bunch of these little tabs up so as my folders change I can make a new tab!
Amazing how a pretty little desk organizer can change your attitude about getting work done!


Here is my desk so far.  I am working on getting it all organized!
The drawers that fit in the cubbies are all make out of recycled cereal boxes and Cliff Bar boxes!

Can you see all the possibilities for these hanging folders?
What a cute moving present, birthday present, or anytime present to give to a friend out of their favorite colored cardstock!  The possibilites are endless!

You can find the desk top hanging file holders just about anywhere.  Staples, target, and organizational stores will all have them.  This one I remembered was sitting in my storage room from about 10 years ago!  I got it out, dusted it off, and ta-da!

Hope you enjoyed this tutorial!  If you decide to make some for your desk, leave a link in the comments...I would love to come and see what you have created!

Hope your day is filled with blessings and creativity galore!