


So let's get started!
1. Go to a local office supply store and have them cut the paper pads in half.

2. Cut your base paper (5 3/8" wide x 8" long) out of cardstock or double sided patterned paper.
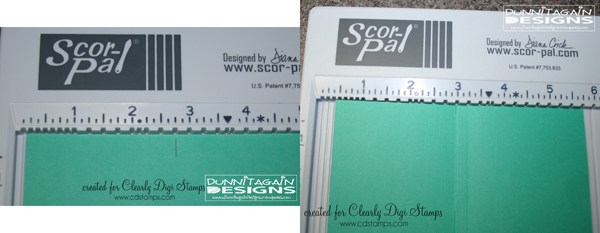
3. Lay your pad of paper on the edge of the paper and make a pencil mark so you know where to score.

*note* I ran the image through a Xyron sticker maker so the whole back is covered and hopefully the edges wont come up. I also used the laminate cartridge so the top is laminated and the bottom is sticky.


7. Since the slit area isn't very pretty I decorated it to cover it up!


9. I used 1/2 inch scor-tape to place the patterned paper on the paper pad.


10. Now stick 1/2 inch scor-tape on the back of the paper pad so it can be adhered to the bottom of the cover.


Here are a few more examples!

Sketch: Tuesday Morning Sketches #198

Sketch: Sketch Saturday #259
I cut this one wider to fit the pen on the right side.
I would love to hear your thoughts on my gift idea! Oh and if you make some please leave me a link...I would love to see them. If you have any questions about this post please ask and I will do my best to answer.
Don't forget to come back on Friday for a Special Digital Stamp Release and Challenge!
- Kathy D.

5 comments:
Hi Kathy! It's Kathi from 613 Avenue Create...I didn't have your email to reply to your comment at the blog. Thanks for bringing the rules to my attention. They were in the right sidebar, don't know what happened to them! However, you may enter as many times as you like, no back linking, link to the post not the blog and provide a link back to the challenge. You know ...the usual rules :) All challenges are Anything Goes with a twist, you can use the sketch or not. You should definitely enter this project! This notepad has been on my "projects to make" list forever! LOL! I love how you tied yours with the ribbon and I especially like the teacher pad/pen set!! So, long story short, come join us!
Kathi
Co-Owner
http://avenue613.blogspot.com/
Kathy, I love your adorable idea. I am going to have to try one of these. Thanks, Nancy
What a fun idea. Thank you for sharing the tutorial.
I've done similar pads but never had one cut in half. What a great idea. I will see if Staples will do it. My cutter certainly wouldn't do it. Thanks for the inspiration!
Really great idea. Thanks for sharing.
Lisa D.
Post a Comment